Have you always wanted a Contact form which would automatically redirect your readers' messages to your e-mail (inbox)? Adding a neat ads-free Contact Form to your blog is simple. You can get a whole lot of free form providers over the internet. But my personal favorite is FormSmarts. And here in this post, I shall discuss how to set up a Contact Form in your blog using FormSmarts free forms. Click on my Contact link on the top navigation menu to see a demo.
Firstly, set up your free account in FormSmarts [formsmarts.com]. After the registration process is over, log in to your account and click on My Forms. This will take you to a page almost similar to the one shown below:
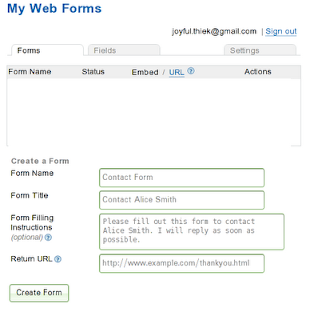
Fill up the necessary fields - Name of Form, Instructions, etc. For Return URL field, you may simply enter your blog url or a thank you page in your blog. Save it for now. Once you're done saving, your incomplete form will appear right on top of the fields you just filled up. [Refer to the pic below].

Click on Add Fields Now. This will take you to the actual form creator. Add all the fields you want to. Example - Name, E-mail, Message, etc. [See pic below]
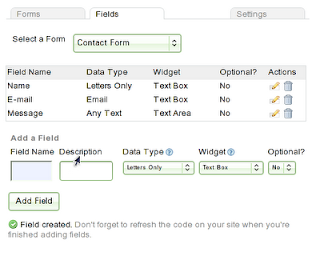
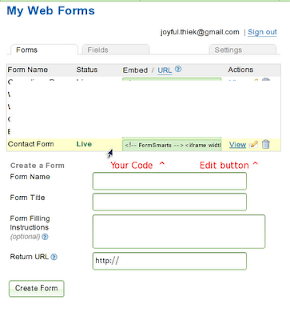
Once you're done adding necessary fields and indicating their respective field types, click on the Forms tab (top left). There you will see something like the picture shown below. [The white rectangular area will not appear in your page; I'm only keeping it to hide my other forms].
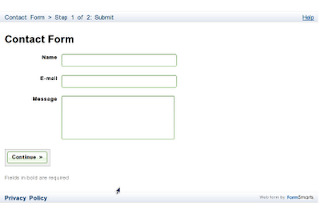
Click on View to preview your form. Mine is shown below:
If you're not satisfied, you can make changes by clicking on the Edit button which is indicated by a Pencil sign. When you're finally done with the necessary changes, select and copy the Form Code/Script. The Code/Script is to the left of the View link.
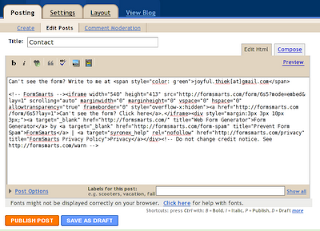
Now, open your Blogger Dashboard and create a new Post. You can have the title of the post as Contact or anything. And within the post content area, Paste the Code/Script you copied from the previous step. You can also add any other text you want to within the content area. Publish and link it to your Contact link in the Navigation Menu.
Like this post? Don't forget to bookmark/share it using the share button in the post footer.
Labels
- Blogger templates (3)
- Cherrapunji (1)
- Free Hosting (1)
- Health (1)
- My Works (2)
- Products (1)
- Rants (3)
- Read More (1)
- Reviews (2)
- Revolution Series (2)
- Sarahah (1)
- Shillong Teer (1)
- Snapchat (4)
- Softwares (1)
- Teer Results (1)
- testosterone injections (1)
- Tips (1)
- Tips N Tricks (2)
- Tourism (1)
- Wordpress (1)
How To Add A Contact Form To Your Blog
Subscribe to:
Post Comments (Atom)
6 comments:
Wow!! I did it! Thank you so very much. :) :) :)
I don't understand - if you paste the code in a new post, it shows up as though it's a new blog post. Do I have to create another blog page in order to be able to do this? I thought I could just have a contact button that would link to this form.
Thanks for your help!
@Lindsey: Yes it shows up as a new blog post. But you can change the date of posting to a much earlier date by clicking on Post Options just below the body area of the new post section. This way it won't show up in the main page. You can then link to that post.
Or if you want the form to be elsewhere, you might want to try Contactify [contactify.com].
Good day. I'm the creator of myContactForm.com and would like to thank you for the mention in your blog. We have a complete tutorial for adding myContactForm.com forms to Blogger which can be found here:
nice one and useful to any web designers..
nice post!..
Post a Comment